Tuesday, January 31, 2012

Stuck Out In The Rain


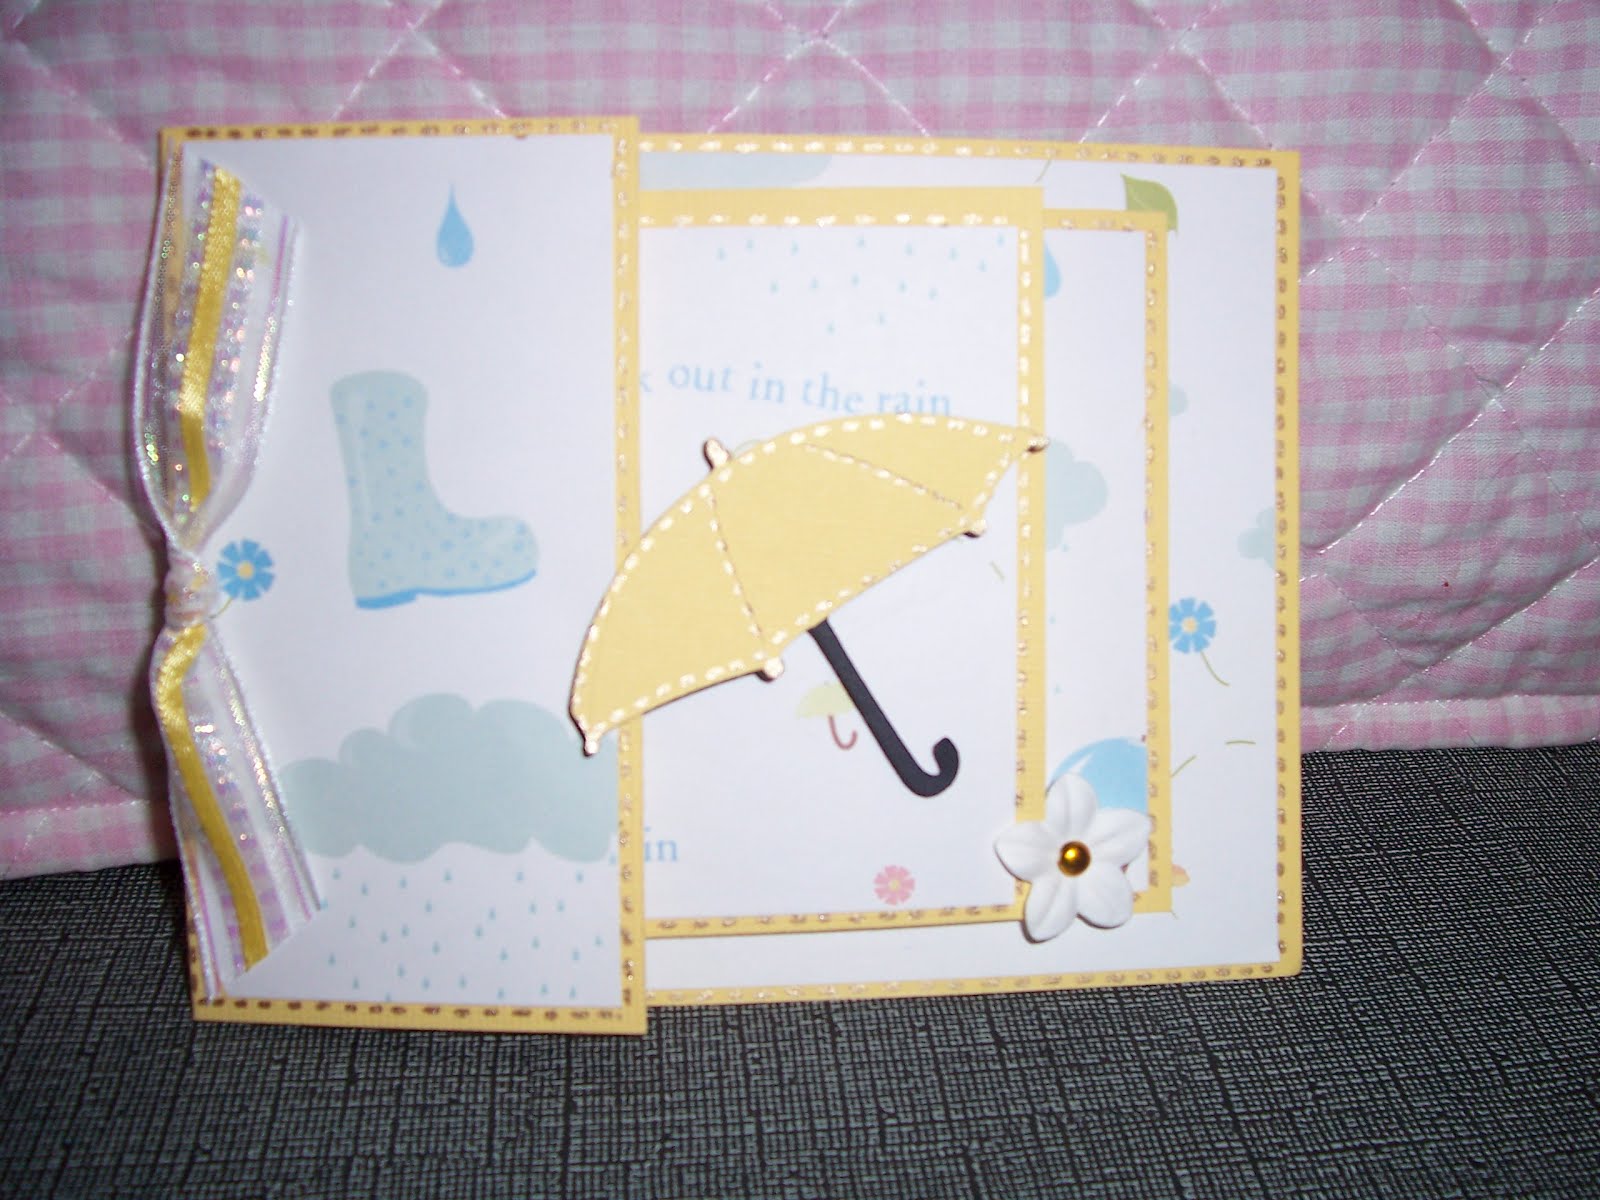
I tried a new card fold-Joy fold I seen on Cards TV. You can see Mary's video here: http://cardztv.blogspot.com/search/label/Joy%20Fold%20Card Unfortunately my card base did not turn out as it was suppose to. To salvage my card I decided I liked the way it turned out anyway. What do you think?

I used A Child's Year to cut the umbrella at 1.34" and the silhouette at 2". I then used foam squares to pop up the umbrella and flower and used the corners as a closure. I used a jelly roll pen for the stitching. The ribbon is from my stash. The sentiment is from TPC Studio- Playful Expressions. I hope you like how I turned a mistake into a tiered card.

I am entering in the following challenges:
1. http://shesasassylady.blogspot.com/2012/01/card-party-was-blast.html

2. http://craftspotbykimberly.blogspot.com/2012/01/monday-challenge-anything-goes.html

Saturday, January 28, 2012

A Little Pick Up For You

Welcome!!

I created this card for two challenges I wanted to enter. Masculine cards are always hard to create and this one was no exception. My card base is 5x7. I used Recollections- Jolly and Bright. My mat is cut at 4.75 and the paper I used is from Cloud 9 Designs. I used Just Because Cards for my truck and cut it at 6.25 and all the layers. After assembling I decided to use buttons for the wheels. I inked the edges using Distress- Vintage Photo. The stitching was done using my Jelly Roll pen-white. The label was cut at 2" from Lacey Labels and then I added I Rocks around the edges. I used foam tape on the truck and label to add dimension.

I am entering in the following challenges:
1. http://craftspotbykimberly.blogspot.com/2012/01/monday-challenge-42-lets-hear-it-for.html
2. http://fantabulouscricut.blogspot.com/2012/01/challenge-me-monday-95.html
3. http://www.cardztv.blogspot.com/2012/01/cardz-tv-challenge-4-its-guy-thing.html

Thursday, January 26, 2012

Fantastic Giveaway!!!!!

Georgie over at http://georgie-hornpuddinnpie.blogspot.com/2012/01/january-huge-giveaway-what-do-you-have.html has an amazing give away but hurry to enter as this give away ends January 31st.

Valentine's Day Card


I recently purchased the new Cricut cartridge Victorian Romance and had to create a card. This cartridge has some great images to cut for Valentine's Day.

Recipe:
Cricut cartridge- Victorian Romance
Doilie
Ribbon from my stash
Viva Decor-Pearl Pen
Embellishments from my stash

Hope you like my card!

I am entering in the following challenge:
1. http://thepinkelephantchallenge.blogspot.com/
2. http://myshericrafts.blogspot.com/2012/01/my-sheri-crafts-challenge-77-new-things.html-new technique,new things

Monday, January 23, 2012

Giveaway at Owl Be Craftin


Here is what's included: One spring stamp set from Studio G, one Valentine's stamp set from Studio G, adhesive faux pearls from Recollections, twine from The Twinery in Maraschino and Blossom, and Tim Holtz Distress Ink in tea dye.

To be eligible for this giveaway:

Be a follower of my blog and leave me a comment on this post.
For a second chance to win, create a post on your blog about this giveaway and then come back here letting me know you did.
For a third chance, "like" the Owl Be Craftin' Facebook page! (You can find it on the right-hand sidebar ---->)

I will pick a winner once I reach 100 followers or on February 1st, whichever is sooner. Good luck to everyone!
Visit her blog here: http://www.owlbecraftin.blogspot.com/2012/01/giveaway.html

Sunday, January 22, 2012

Let It Snow


I had a lot of fun making this card. I used George and Basic Shapes and welded the circles together with my Gypsy. The card base is cut at 6x6. Next I embossed the front of my card using the Sizzix snow flake embossing folder, then lightly inked the edges and the raised images with Stampabilities Ink-Baby Blue.

I then used Winter Frolic to cut my snowman at 3.5" and the layers. After applying all the layers I used the Simple Sallies face from Peachy Keen and inked the edges with Tim Holtz Distress Ink-Vintage Photo. I then pop dotted onto my card.

The tag is from My Creative Time-Build a Banner set. The sentiment is from Studio G. Gotta love those $1.00 stamps!! I also pop dotted the tag.

The snow flakes are actually seguins and I used a Viva Decor Pearl Pen for the centers.

I used three different types of ribbon or twine from my stash.

I am entering in the following challenges:
1.http://craftspotbykimberly.blogspot.com/2012/01/monday-challenge-41-snow-much-fun.html
2. http://fantabulouscricut.blogspot.com/2012/01/challenge-me-monday-94.html
3. http://www.gettingcricky.com/2012/01/simply-sunday-challenge-let-it-snowuse.html
4. http://paperplaytime.blogspot.com/2012/01/ch-65-tags-include-sentiment.html
5. http://www.whimsical-designs.com/2012/01/anything-goes-whimsical-wednesday.html
6. http://www.cookingwithcricut.com/2012/01/winter-warmies-challenge.html
7. http://littlescrappieces.blogspot.com/2012/01/winner-and-new-challenge-use-blue.html

Sunday, January 15, 2012

Valentine's Day


Recipe:
Card Stock--Recollections
Embossing Folder--Cuttlebug, Hearts
Paper Doilie
Ribbon--From Stash
Embellishments--From Stash
Sentiment--Studio G
Gel Pen--Jelly Roll
Die Cut--Creative Time,Stitched Oval
I-Rock

I made this card for a challenge over at Going Buggy, it is her first challenge of the year. For the challenge you are to create a card or project using the colors Grey, White and Red or Black, White and Red.

I am entering in the following challenge:
1.http://going-buggy.blogspot.com/2012/01/going-buggy-challenge.html
2. http://cardztv.blogspot.com/2012/01/cardz-tv-design-team-challenge-3.html
3. http://reasonableribbon.blogspot.com/2012/01/rrr-challenge-40-valentines-day-theme.html

Friday, January 13, 2012

Sunday, January 8, 2012

Warms My Heart


Ingredients:
Cricut Cartridges- George and Basic Shapes, cut at 5.5 x 5.5
Love You a Latte, cut at 4.25
Card Stock- Mauve
Colorbok Die Cut
Jelly Roll Pen- Metallic Gold
Distress Ink- Vintage Photo
Embellishments from stash
Creative Time Die- Fancy Frames
Sentiment- Fiskars Latte Love

I received the Love You a Latte cartridge for Christmas and this is my first card using it.
The sentiment stamps are from a challenge I won over at She's A Sassy Lady. Thank you Shelia!!! Shelia's blog is inspirational and informative and the creativity is amazing. She is very generous in sharing her cut files, tips and tricks. Stop by her blog here http://shesasassylady.blogspot.com

I am entering in the following challenge:
1. http://fantabulouscricut.blogspot.com
2.http://www.cookingwithcricut.com/2012/01/challenge-67-something-new.html

Saturday, January 7, 2012

Pounded Flowers

There was some interest in how you make the pounded flowers so here is the directions.
Tools needed:
Sturdy flat surface
Cardstock
Fresh Flowers and leaves
Paper towels
Aluminum foil
Hammer

Cut your card base to desired size, score.

The best flowers to use for this technique are flat faced flowers such as Violets or Pansies. The leaves can be Ferns or Evergreen pieces.


Use the following sandwich on your sturdy flat surface: scrap piece of cardstock, closed card base. Flowers are face down on the card base. Arrange your flowers and leaves in any design being careful not to get to close to the end of your card.


Carefully cut away the green top that the stem is attached to, make sure all the petals are still attached. You can overlap your flowers. Then place a paper towel over your flowers then the foil. Top with another piece of scrap cardstock. The cardstock keeps your card from getting the hammer marks. Pound with the hammer, you are transferring the natural pigments in the flowers to your card. Carefully check to see if you have pounded all the flowers and leaves. If not, cover and pound some more. When you are finished pounding, take the cardstock, foil and paper towel off and let the card dry overnite with the flowers and leaves still attached. It will look like a big mess.


After your card has dried overnite scape off all the dried flower pieces and this is what you will get.....


Hope this helps. There are numerous videos on You Tube, type in the search box pounded flowers and it will take you to the videos. Hope you enjoyed the tutorial.

Wednesday, January 4, 2012

Thank You Card

I used a new technique I learned called pounded flowers for the border on my card, if anyone would like to know how it is done please leave a comment and I will get back to you.
Ingredients:
Cardstock
Glitter
Ribbon
Cricut Cartridge Mothers Day Bouquet, Lacey Labels
Rhinestones
Twine

I am entering in the following challenge:
1.http://shesasassylady.blogspot.com/
2. http://reasonableribbon.blogspot.com/
3.http://www.creativecutterroom.com/2011/12/design-time-thursday-sparkletime.html

Monday, January 2, 2012

Wedding Celebration


Ingredients:
Card base 5x7
Cricut Cartridge-Paper Doll Dress Up
Ribbon from stash
I Rock
Flowers are quilled ribbon

I am entering in the following Challenge:
1. http://www.gettingcricky.com/